Material animations
Description
Custom materials in Rolled Out! can have scalar, vector2, and vector3 parameters animated with curves. Material properties can be accessed using data paths such as:
For scalar values:
parameter_overrides.scalar.metallic_multiplierFor vector2 values:
parameter_overrides.vector2.tex_coord_offset.yFor vector3 values:
parameter_overrides.vector3.base_color_multiplier.z
You can plug these data paths into a float animation channel, and attach animations to materials.
For a list of what base materials have which properties, see Base materials.
Config example: A scrolling texture for a conveyor
There’s a fair few chunks of JSON required to set up a conveyor object here.
Making a mesh node
For starters, somewhere in /scene_graph in a stage config, we want to add a mesh node that’s
marked as a conveyor. Note the conveyor and conveyor_uv_velocity properties below. In addition, we give this
mesh a material of material_conveyor, which we’ll define further down.
This creates an object that when touched, will behave like a conveyor and impart a force on the ball, but which would visually look stationary (until we create our material).
{
  "name": "node_conveyor",

  "type": "mesh_node",

  "transform": {
    "position": { "x": 0.0, "y": 0.0, "z": 0.0 },
    "rotation": { "x": 0.0, "y": 0.0, "z": 0.0, "w": 1.0 },
    "scale": { "x": 1.0, "y": 1.0, "z": 1.0 }
  },

  "node_data": {
    "mesh_reference": {
      "mesh_file_name":"model_main",
      "mesh_object_name":"PlaneConveyor"
    },

    "conveyor": true,
    "conveyor_uv_velocity": { "x": 0.0, "y": 5.0 },

    "material_slots": [ "material_conveyor" ]
  }
}
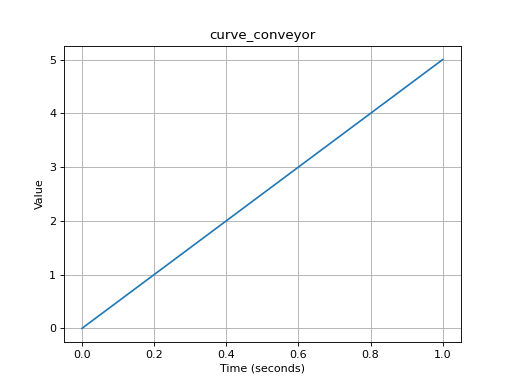
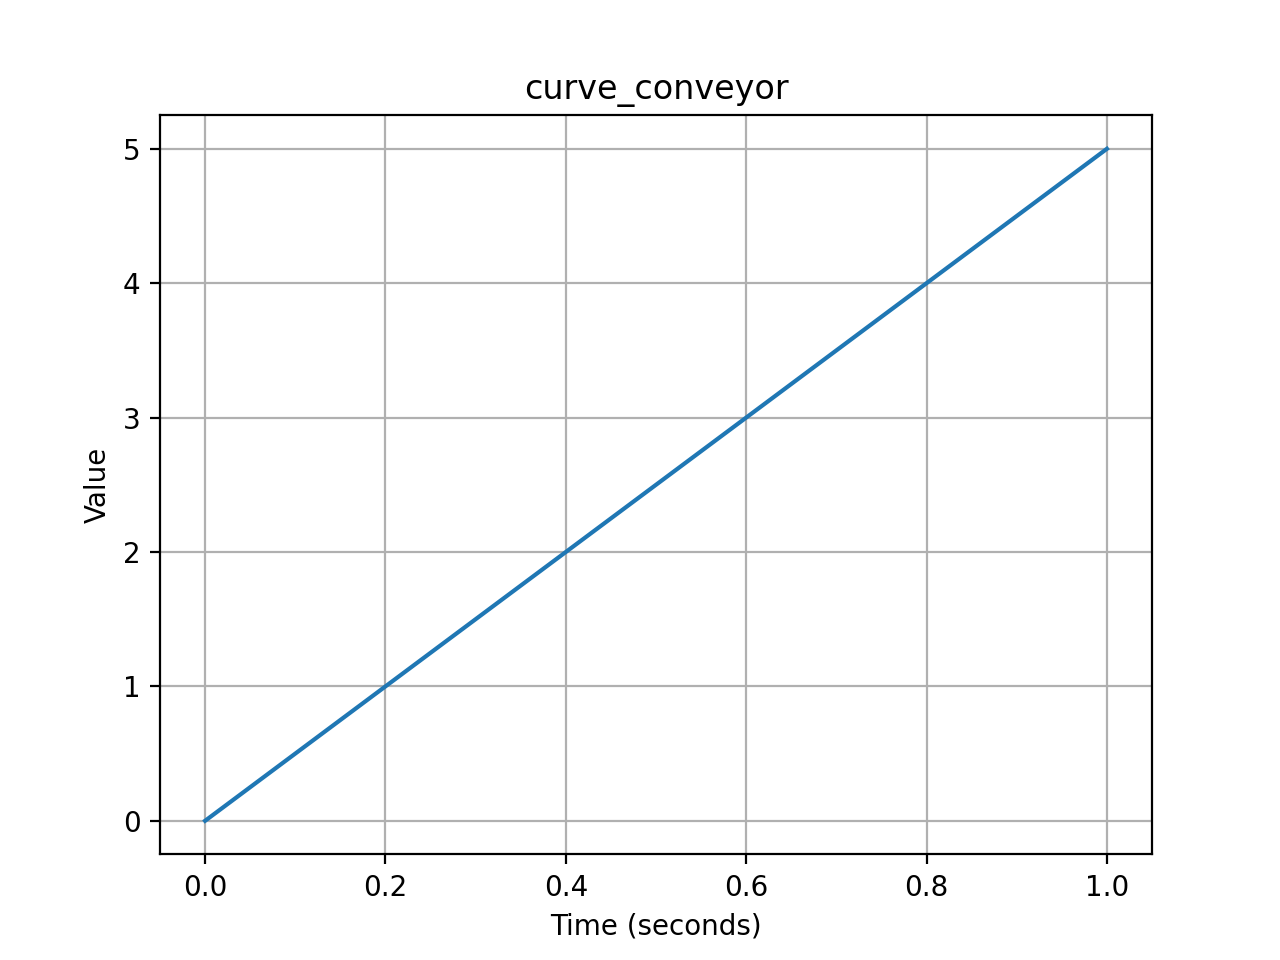
Creating the scroll curve
To make the texture scroll on our new object, we want to define a curve for how the texture
should scroll. This one is a simple straight line, starting at XY 0.0, 0.0, and going to XY 1.0, 5.0. This means that
over a period of 1 second, the texture will scroll over a point 5 times (the same as our conveyor_uv_velocity value
in the mesh node!).
As we’re using linear interpolation (which connects keyframes by straight lines), the
values for each keyframe’s left_handle and right_handle don’t matter.
The following should go in the /float_curves section of a stage config.
(Graph downloads: plot source code, png, hires.png)
{
  "name": "curve_conveyor",

  "keyframes": [
    {
      "interpolation": { "type": "linear" },
      "left_handle":   { "position": { "x": 0.0, "y": 0.0 }, "type": "auto_clamped" },
      "control_point": { "position": { "x": 0.0, "y": 0.0 } },
      "right_handle":  { "position": { "x": 0.0, "y": 0.0 }, "type": "auto_clamped" }
    },
    {
      "interpolation": { "type": "linear" },
      "left_handle":   { "position": { "x": 1.0, "y": 5.0 }, "type":"auto_clamped" },
      "control_point": { "position": { "x": 1.0, "y": 5.0 } },
      "right_handle":  { "position": { "x": 1.0, "y": 5.0 }, "type":"auto_clamped" }
    }
  ]
}
Adding the curve to an animation
Once we have our curve, we can hook it up to an animation. We can attach our curve to an
animation channel, with a data path of
parameter_overrides.vector2.tex_coord_offset.y. We also add a loop zone, so the animation will continuously repeat.
{
  "name": "anim_conveyor",

  "float_channels": {
    "parameter_overrides.vector2.tex_coord_offset.y": { "float_curve": "curve_simple" }
  },

  "initial_time_scale": 1.0,
  "loop_zone": {
    "start_time": 0.0,
    "end_time": 1.0
  }
},
Creating the material
Finally, we can create our animated material. We start with a simple “opaque lit” base
material, set the main texture we want to use for it (by overriding base_color_texture from the
base material), and give it our anim_conveyor animation. The animation will take care of modifying the
tex_coord_offset.y property on the material.
{
  "name": "material_conveyor",

  "base_material": "rolledout:mat_surface_opaque_lit_generic",

  "animations": [ "anim_conveyor" ],
  "parameter_overrides": {
    "base_color_texture": {
      "type": "texture2d",
      "value": "a1_png"
    }
  }
}